John Torelli - Jersey Small Arms Gunsmithing
Millville NJ
The
Tips Page
"If it's not broke, it will be if
you don't take care of it !"
This information is provided freely with the understanding that the end user has the responsibility to determine whether or not it applies to his particular situation. I accept no responsibility for damage, abuse or misuse of your firearm. Help preserve your right to keep and bear arms - use your guns responsibly.
(Page Updated - February 10, 2024)
![]() Home Page
Home Page ![]() Basic Shop Pricing
Basic Shop Pricing
![]() Events Page
Events Page ![]() The
Back Page
The
Back Page ![]()
![]() Cumberland
Riflemen Gun Cleaning Seminar
Cumberland
Riflemen Gun Cleaning Seminar ![]()
![]()
INDEX:
GENERAL TIPS:
-Lubrication: "Keeping your gun alive"
-Headspace: "Gauging Safety"SHOTGUN TIPS:
-Browning Auto 5: "Friction ring operation"
-S&W Model 1000: "Gas Piston Jams"HANDGUN TIPS:
-Colt 1911 Info: "Standard Safety Checks"
-Colt 1911 Info: "Firing Pin Block Safety Assembly"ITEMS OF INTEREST:
-Handy Accessories: "You need this stuff."THE GUN BUYERS PAPERWORK GUIDE:
-BATF Purchase Forms: "All three pages of it."
Lubrication - Keeping your gun alive
|
|
"What should I use to oil my
gun?" Let's start with what you shouldn't use - WD40 or anything like it. WD-40 is a fine light duty oil and rust penetrator. Your gun is most likely blued. Blueing is a rust process. WD-40 removes rust. Over time the regular use of WD-40 on your gun will leave the finish bare metal! There is a product on the market called Tri-Flow that's a Teflon based lubricant with remarkable staying power. I've recommended this product for many years and have never been disappointed. Tri-Flow has repeatedly gained first place in comparison tests. It's only possible drawback may be its odor. It has a slightly sweet smell that may be detected by game animals in the field, although I have no evidence that this is so. (By the way, I have no financial interest in Tri-Flow, I just know that it works.) "What
about
grease?" "I squirt some
oil into my gun after hunting and then put it in my gun
rack. Shouldn't this be enough?" "OK then, what
should I do?" "That's
all?"
"I
have
a
Flaming Arms Super-X .30-06 Lever Action Assault Rifle,
how do these tips work for me?" |
|
|
|
|
|
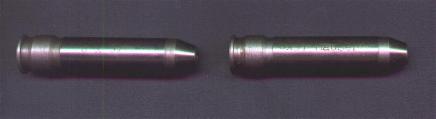
| (Forster Headspace Gauges) |
|
|
Over the last few years there has been a major
influx of surplus military firearms into the United States.
Personally, I love it. As a dealer, I've gotten a lot of
satisfaction out of helping customer's complete their collection
of, for instance, British Enfield rifles. As a Gunsmith, however,
I need to point out that many of these old rifles have been around
since before the beginning of the last century and may be unsafe
to fire due to excess headspace. Headspace can be thought of as something like this: The cartridge in your chamber is in a safe with the bolt of the rifle as the door. That cartridge has to be held tightly by the door or the cartridge could rupture and allow the explosion to vent back out of that door with disastrous and dangerous results. Headspace gauges are used to determine how tight this lock-up is. For each rifle that you want to check you must remove the bolt and COMPLETELY disassemble it. The stripped bolt must be able to enter the barrel breech with no resistance and the bolt face must contact the gauge properly or you will not be able to feel the lockup when you close the bolt on the gauge. Next clean out the chamber, being absolutely certain there is no powder residue, rust, oil or anything else in it that will prevent the gauge from properly seating in the chamber. The chamber gauges are specific to the caliber of gun. Be certain you obtain and use the correct gauge for your various rifles. The gauges come in "Go", "No-Go" and "Field". The "Go" gauge is used primarily for fitting new barrels. You should only need the other two. Start by slipping the "No-Go" gauge into your chamber and then gently close the bolt on the gauge but DO NOT try to force the bolt handle down. Instead, ease the bolt handle down onto the gauge. It should NOT close completely. If the bolt does close completely remove the gauge and insert the "Field" gauge and try again. If the bolt closes completely on the "Field" gauge the gun may be unsafe to fire. If it does not close completely it is presumed safe to fire, however accuracy may suffer and the rifle should be considered ready to retire. Just remember to play it safe. If the gun is marginal it's best to hang it on the wall in a place of honor and use something else. The gauges can be purchased from Brownells, Inc. Check out their web site for ordering info. |
|
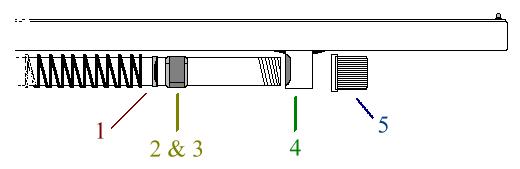
![]() Browning Auto 5 Friction Ring
Assembly
Browning Auto 5 Friction Ring
Assembly
|
||
|
|
The above illustration of a Browning
Auto 5 Shotgun shows its rings set for heavy loads. You can, but it will pound the hell out of your gun and leave your shoulder black and blue for several days. Not much fun. In reverse, if you try to shoot light loads with the rings set for heavies the gun will fire, but only once. Light loads don't generate enough recoil to overcome the friction rings and the action won't cycle completely, if it cycles at all. At best you'll have to work the bolt by hand to eject the fired shell and load the next round. Or worse, it may partially extract the fired shell leaving it jammed halfway out of the gun with a live round coming up the feed guide. Unless you like disassembling your gun with live ammo jammed in it, while your out in the woods in December, I suggest you set the rings properly. |
|
|
|
|
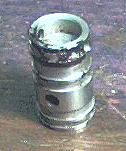
Manufactured for S&W by Howa Machinery of Japan the Model 1000 is a very sound gun indeed. Although S&W got out of the shotgun business in 1985 a good many Model 1000's are still being used regularly. The first thing to look for when a Model 1000 begins to malfunction is the black sticky residue shown on the Piston in the photo to the left. The Piston is the heart of the gas operation that works the feeding and ejecting of the gun. To get to the piston remove the barrel (is it necessary to remind you to unload it first?) You should be able to easily remove the Pressure Valve. Next remove the pin that connects the large black ring on the outside of the magazine tube to the Piston inside the tube and slide the black ring off the tube. The Piston should come out easily if it's clean, if it looks like the one in the photos it won't. |
|
|
|
|
|
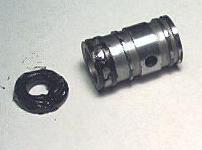
The photo to the left shows the culprit in this mess. It's the Piston Shock Absorber and it's located next in line down the Magazine Tube. The Shock Absorber is just a steel washer with a rubberized cushion stuck to it. After many years and especially if any oil gets on it, the cushion dissolves and leaves a part of itself stuck to the Piston as the Piston bumps into it under recoil. Replacements have recently become available through the Gun Parts Corp. and they seem to be quite durable. Over the years, however, I've been replacing these worn out Shock Absorbers with a plastic (not rubber) hose washer available at most hardware stores. Just trim the washer to fit the tube snugly and place it on top of the remaining factory steel washer. One other thing to look for is dents on the long slots on either side of the magazine tube where the Connecting Pin rides. When the Shock Absorbers get really bad it can allow the pin to slam into the end of the slots denting them up pretty badly. This can cause the entire assembly to stick and create a jam. The best preventative for all of this is to NEVER let any oil get anywhere near this assembly. |
|
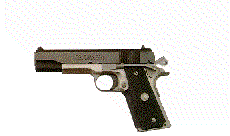
||
SERIES 80
FIRING PIN SAFETY ASSEMBLY
|
These are the parts involved with the Colt Series 80 1911 style handguns and some copies. At the top is the plunger (visible with the slide locked open and veiwed from underneath) which blocks the firing pin from moving forward unless the trigger is pulled. It is spring powered to keep the thicker end down and in contact with the firing pin. The part in the middle is the finger which rotates and pushes the plunger upwards. This allows the firing pin to pass through the narrow middle section of the plunger. This finger is moved by the lever at the bottom. The lever itself is moved by the rear of the trigger when it contacts the levers lower extension as the trigger is pulled to fire the gun. A very clever arrangement that helps prevent the gun from going off should it be dropped directly on the end of the hammer, on a hard enough surface, from sufficient height, while fully cocked with a live round in the chamber. Other wise it does nothing useful. |
| In most factory guns these parts go about their business un-noticed by the user, however, almost any modification to the sear or hammer surfaces, such as in a trigger job, will almost always destroy the fragile timing of the parts and cause the gun to misfire. The parts can be removed with no ill effect on the operation of the gun so long as the two lower parts are replaced by a small frame filler plate available from Brownells for about $15.00. Removal of the plunger will only leave an empty hole in the bottom of the slide. Be aware that removing a safety mechanism in this age of political correctness could void warranties or leave you liable for damages under the unique circumstances that the safety was designed for, but at least you'll know your gun will fire should the need arise. It's up to you. |
Don't
miss out on this link.
It's one of the most comprehensive
sites about the 1911 pistol I have ever found.
Just about anything
you could ever want to know about the 1911 pistol is posted here.
 |
| 1911 Home Page |
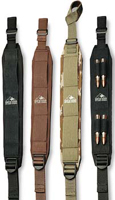
![]() SLINGS
AND SWIVELS
SLINGS
AND SWIVELS
|
Whether it's camo nylon or a leather Cobra strap there's nothing handier than a good, comfortable sling. It's a must for climbing in and out of tree stands, covering rocky terrain or activating another hand warmer in a snow covered field. Get one with an Uncle Mikes Quick Detachable swivel and you'll wonder how you ever got along without it. |
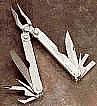
![]() TOOLS
TOOLS
|
You've got to carry a Leatherman utility knife. The needle nose pliers, phillips head and standard screwdrivers alone will be more useful than you could ever imagine. You'll find everbody around you wanting to borrow it for some reason and then not wanting to give it back. Check one out and you'll be amazed at it's capabilities. If you need to repair your gun in a wilderness situation it could salvage your hunt, or save your life. I don't go to church without my Leatherman. |
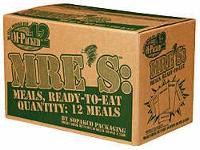
 FOOD
AND SUCH
FOOD
AND SUCH
|
If your concerned about the future, or for that matter the present, DO NOT go to Cheaper Than Dirt and click here for the reason why. |
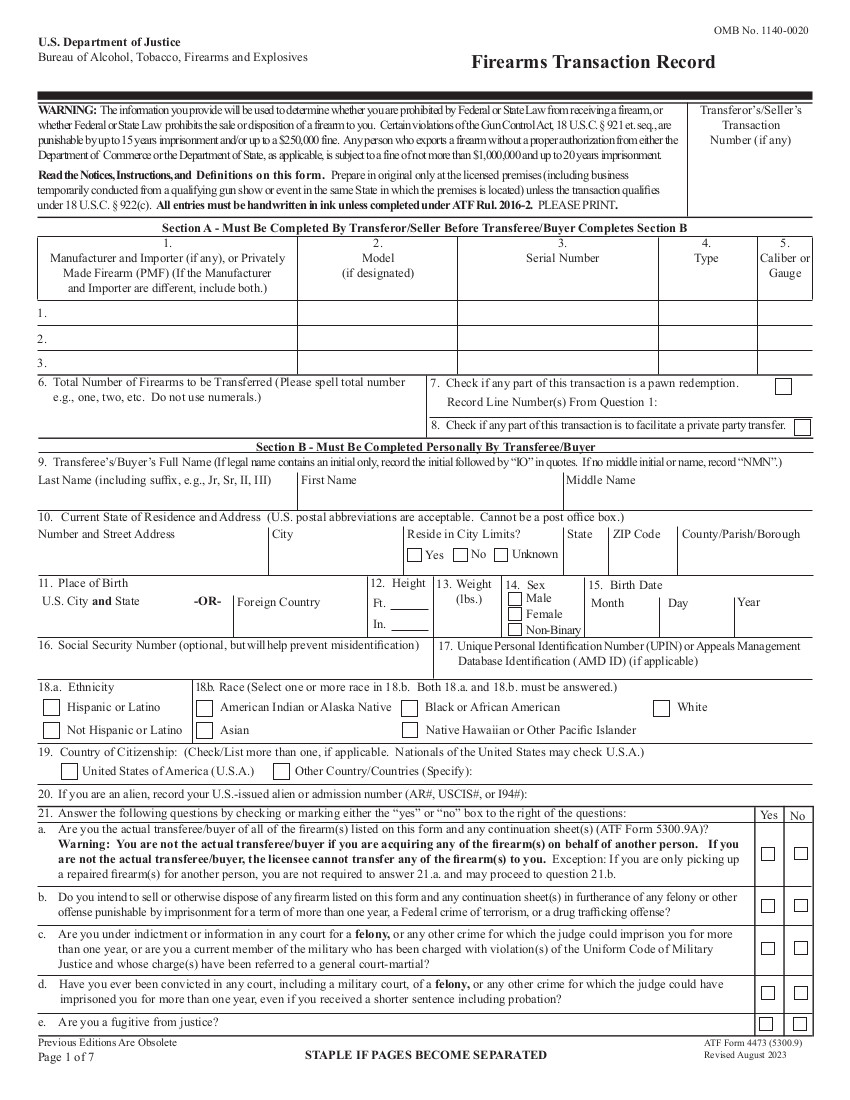
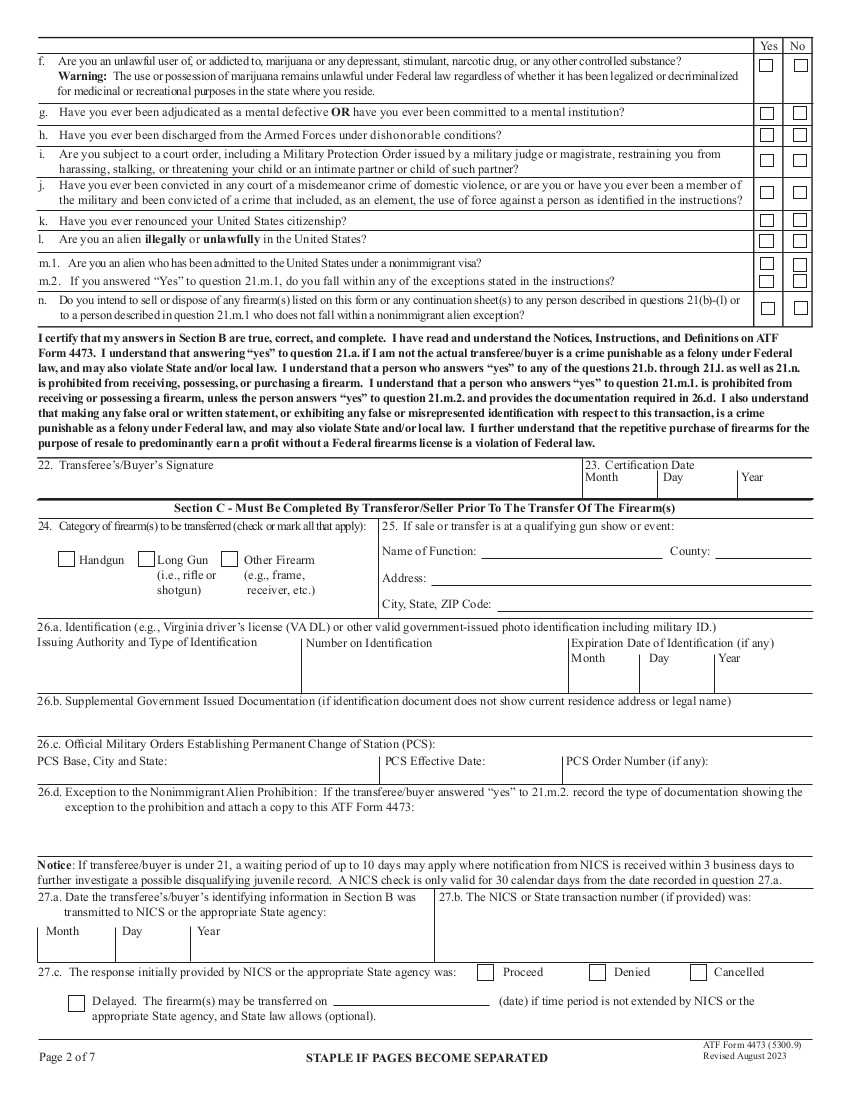
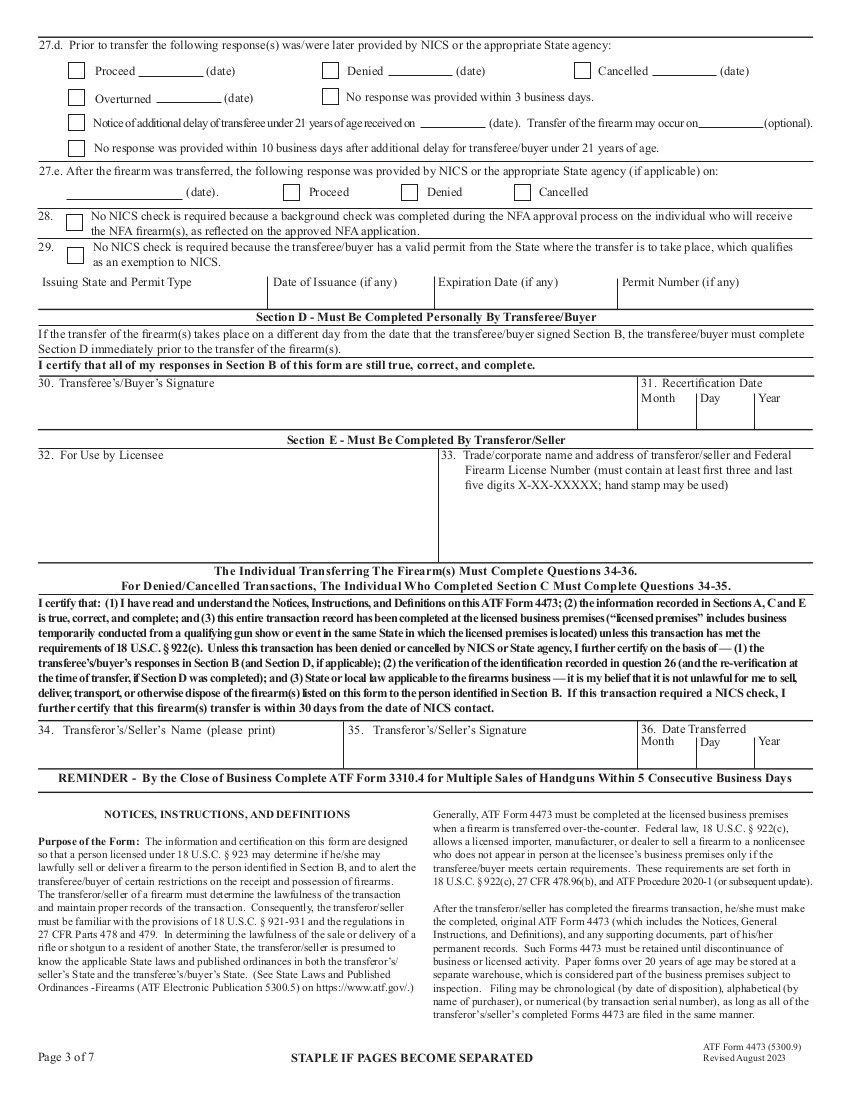
![]() FORMS YOU'LL FILL OUT AT YOUR
LOCAL GUN SHOP
FORMS YOU'LL FILL OUT AT YOUR
LOCAL GUN SHOP
For all of the people who think
you can walk into your local sporting goods store and pick up an AK47 like you were
buying a bicycle, click on one of these forms and read carefully.
Your doctor doesn't ask you this many questions! By the way,
don't copy these forms to use in place of originals. BATFE will not accept them. There are official forms that
can be mail ordered from the BATFE web site for dealers use. On the back of
these forms there are explanations to the various sections, which can
actually be quite helpful.
NOTE: These forms are the new forms that came out in August 2024.
|
|
 |
 |
 |
| 4473 Page 1 |
Most states also have they're own additional requirements which are covered under the Federal Governments book entitled State Laws and Public Ordinances - Firearms, the last edition being ATFP 5300.5. Now let us not forget, that after all of the above you still have to wait for approval from the National Instant Check System (NICS). Your firearms dealer is required to make this call before you can actually take possession of your firearm. New Jersey charges an additional $15.00 for this "service" whether you are approved or not. Oh, and remember that you must also have an official government photo ID with you before you may take your new gun home.